video-use: Edit Videos with Coding Agents
Video-use: Open-Source AI-Driven Video Editing with Claude Code

A new approach to video editing has arrived with video-use, an 100% open-source workflow that lets you drop raw footage into a folder, chat with Claude Code, and receive a polished final.mp4. It’s designed to handle any content—talking heads, montages, tutorials, travel logs, interviews—without presets or menus. The system focuses on content-aware decisions powered by language models, while keeping control firmly in your hands. Below is a detailed tour of what video-use is, how it works, and how you can start using it today.
What video-use does for you
- Cuts out filler words and dead space
- Automatically removes common speech fillers like umm and uh, as well as false starts, while preserving the natural rhythm of your content.
- Auto color grades every segment
- Applies color grades tailored to the scene: warm cinematic looks, neutral punch, or any custom ffmpeg chain you configure.
- Smooth audio transitions at cuts
- Introduces 30ms crossfades at every cut to prevent pops and jarring audio jumps.
- Subtitles baked into the video
- Burns subtitles in your preferred style, with two-word UPPERCASE chunks by default, and full customization options.
- Animation overlays generated on demand
- Creates overlays via Manim, Remotion, or PIL. Each animation runs in parallel on separate sub-agents, enabling complex visual embellishments without slowing the main edit.
- Self-evaluation at every cut
- The rendered output is evaluated at each decision point to catch issues before you see results, helping ensure quality and consistency.
- Session persistence
- Keeps a session memory in project.md so you can resume next week right where you left off.
Setup prompt overview
The setup prompt is a crucial entry point. Paste it into Claude Code, Codex, Hermes, Openclaw, or any shell-access agent. It automates the initial clone, dependencies, skill registration, and the process of obtaining and using an ElevenLabs API key. The goal is to have you ready to drop footage into a folder and start editing without manual reconfiguration every time.
[Timeline image to visualize the process]
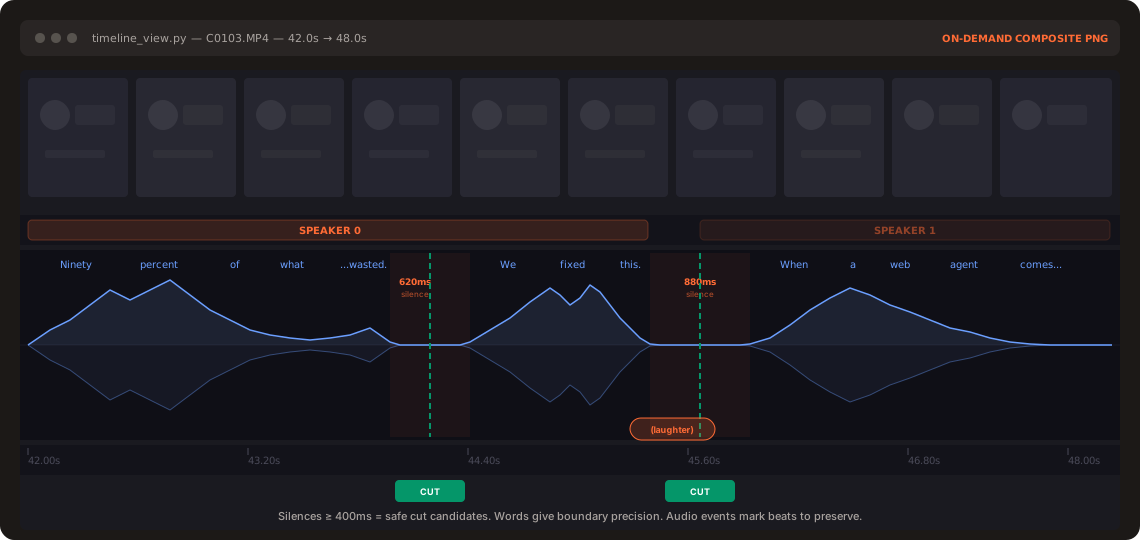
Two-layer insight: how the system “reads” your video
A distinctive feature of video-use is that the LLM never watches the video as a raw feed. Instead, it reads a structured interpretation of the source to cut with word-boundary precision. The design uses two complementary layers that provide the LLM with everything it needs to decide where to cut and how to assemble the final edit.
- Layer 1 — Audio transcript (always loaded)
- Each source is transcribed with word-level timestamps, speaker diarization, and audio events such as laughter, applause, or sighs.
- All takes get packed into a compact takes_packed.md (roughly 12KB), which serves as the primary reading view for the LLM.
- Example excerpt:
- C0103 (duration: 43.0s, 8 phrases) [002.52-005.36] S0 Ninety percent of what a web agent does is completely wasted.
- [006.08-006.74] S0 We fixed this.
- Layer 2 — Visual composite (on demand)
- A timeline_view renders a filmstrip, waveform, and word-label PNGs for time ranges as needed.
- These visuals are produced only at decision points (ambiguous pauses, retake comparisons, cut-point sanity checks) to minimize token and frame processing.
- The idea echoes the concept of providing an LLM with a structured DOM rather than continuous frame dumps—allowing efficient, precise editing guidance with minimal overhead.
A practical perspective: why this matters
- Naive approaches generate huge frames and tokens to process. The video-use approach compresses the essential signal into a 12KB text view plus only a handful of PNGs, which is orders of magnitude leaner than feeding thousands of frames into an LLM.
- The result is a more deterministic, editor-friendly workflow that still leverages powerful AI to identify the right cut points and stylistic choices.
The video-use pipeline: from transcription to final render
- Transcribe
- Generate transcripts with time stamps, speaker labels, and audio event annotations. This forms the backbone for cut decisions.
- Pack
- Collect all takes into a compact, human-readable form that the LLM can parse quickly.
- LLM Reasons
- The model reasons about where to cut, what to remove, and how to structure the edit for clarity and pacing.
- EDL (Edit Decision List)
- Create the edit plan with precise cut points and transitions. This is the blueprint for rendering.
- Render
- Produce the edit according to the EDL, applying color grades, audio fades, subtitles, and overlays.
- Self-Eval
- Inspect the rendered output at each cut boundary. If issues are detected, trigger a fix-and-re-render loop (maximum of three iterations).
- The system only previews after it passes the self-evaluation, ensuring you’re shown a high-quality result.
Design principles that guide video-use
1) Text plus on-demand visuals
- The primary surface is the transcript with calculated overlays. No frame-dumping or unnecessary visuals load unless they serve a purpose in the decision process.
2) Audio-first, visuals second
- Edits are driven by speech boundaries and silent gaps. Visuals are produced to support the narrative flow, not to overwhelm it.
3) Prompt-driven workflow with checks
- The cycle is: ask, confirm, execute, self-evaluate, and persist. The system won’t apply a cut without explicit strategy approval, minimizing unwanted surprises.
4) Content-type agnosticism
- The toolkit assumes nothing about the content. It starts by asking questions, then edits based on results and user feedback.
5) Clear production rules, room for artistry
- The framework enforces 12 hard rules for production correctness while allowing artistic choices in areas like pacing, tone, and style. The official production rules and editing craft are documented in SKILL.md.
How to get started: setup and installation
Setup prompt (high-level)
- Step 1: Set up the repository
- Clone the repository and follow install.md to install dependencies, wire up ffmpeg, and register the skill with your agent.
- Don’t forget to set up the ElevenLabs API key when prompted.
- Step 2: Check daily usage guidance
- Read SKILL.md for the ongoing usage rules and editing craft.
- Step 3: Prepare your workspace
- After installation, tell the agent the environment is ready and place your raw footage into a folder that the agent will monitor.
Manual install (explicit steps)
- Step 1: Clone and symlink
- git clone https://github.com/browser-use/video-use ~\Developer/video-use
- ln -sfn ~\Developer/video-use ~/.claude/skills/video-use # Claude Code
- ln -sfn ~\Developer/video-use ~/.codex/skills/video-use # Codex
- Step 2: Install dependencies
- cd ~\Developer/video-use
- uv sync # or pip install -e .
- brew install ffmpeg # required
- brew install yt-dlp # optional, for downloading online sources
- Step 3: Add your ElevenLabs API key
- cp .env.example .env
- edit .env to add ELEVENLABSAPIKEY=your_key
Note: The self-contained approach means you don’t need to transcribe or format text on your own. When you’re ready, you drop footage into the designated folder and the agent takes over, advising on strategy and then delivering edit/final.mp4 in the edit directory.
Working with the output
- Output location
- All outputs live in /edit/, with the final video named final.mp4 near the source files.
- The project’s tracking file (project.md) preserves session memory so you can resume from where you left off next time.
- Preview and iteration
- The self-eval loop ensures that you see only outputs that have passed quality checks. If the rendered result has subtle issues (visual jumps, audio pops, or subtitle misalignment), the system proposes fixes and re-renders up to three times.
Potential use cases and scenarios
- Talking head videos
- Smooth out filler words and ensure a crisp pace for tutorials, vlogs, or commentary.
- Montages
- Efficiently stitch together clips with coherent color grading and synchronized overlays that accentuate the narrative.
- Tutorials and courses
- Use precise cuts aligned with spoken content to maintain educational clarity, with auto-generated captions for accessibility.
- Travel vlogs
- Preserve the flow of a journey, while removing dead space and enhancing color to convey the mood of scenes.
- Interviews
- Maintain a natural cadence by balancing cuts to match dialogue and minimize abrupt transitions.
Visual aids and reference assets
- Banner image
- The hero banner provides a visual identity for video-use and sets the tone for the blog post.
- Image source: static/video-use-banner.png
- Timeline view
- The timeline_view composite showcases how the system visualizes filmstrip, speaker track, waveform, and word labels at critical decision points.
- Image source: static/timeline-view.svg
What to expect in ongoing development
- Expanded animation overlays
- More tools and libraries may be integrated for richer overlays and more nuanced visual storytelling.
- Improved self-eval signals
- The evaluation heuristics may be extended to handle a broader set of edge cases, including multilingual content and more complex soundscapes.
- More robust session persistence
- Enhancements to project.md could allow even richer tracking of edits, notes, and preferred stylistic choices across sessions.
A closer look at the philosophy
Video-use is designed to minimize the friction between human intent and machine-aided editing. By letting the transcript lead and visuals respond on-demand, the system maintains a human-centric workflow while leveraging AI to handle the repetitive, detail-oriented tasks that traditionally slow down editors. The architecture emphasizes safety and predictability: no delete-and-guess edits, no surprise re-renders, and a clear path for refinement through the self-evaluation loop. The result is a pragmatic balance between automation and editorial craft that can scale from a single-shot social video to a multi-part tutorial series.
Practical tips for best results
- Prepare clear source material
- High-quality audio with balanced levels and minimal background noise helps the transcript layer be accurate and reliable.
- Define your style preferences early
- Decide on color grade presets, subtitle styling, and any preferred animation motifs. These choices can be encoded in the initial prompts or SKILL.md guidelines.
- Use a consistent folder structure
- Place raw footage in a monitored folder and keep all outputs in /edit/. A clean workspace reduces ambiguity for the agent and speeds up processing.
Frequently asked questions (quick references)
- Do I need to know how to code?
- No. While video-use leverages code-facing agents, the workflow is designed so you can simply drop footage, chat with the AI, and get a finished video back.
- Can I customize the output style?
- Yes. Subtitles, color grades, and overlays are customizable. The system uses a default two-word UPPERCASE subtitle chunking, but every aspect can be adapted.
- How does the self-evaluation loop work?
- After rendering a cut, the system analyzes the result for visual continuity, audio pops, and subtitle correctness. If issues are detected, it prompts fixes and re-renders, up to a maximum of three attempts.
Conclusion: a new paradigm for AI-assisted video editing
Video-use represents a practical, open-source path to AI-assisted video editing that places the editor’s intent at the center. By combining two layers of AI interpretation—the precise transcription-based planning and on-demand visuals for decision points—with a robust pipeline that proceeds from transcription to render to self-evaluation, it offers a repeatable, high-quality workflow. The emphasis on stability, session persistence, and a transparent design philosophy makes it accessible to hobbyists and professionals alike. If you’ve ever wished for a more predictable, AI-powered editing companion that respects your content and your process, video-use is worth exploring.
Images referenced in this post
- Video-use banner: static/video-use-banner.png
- Timeline view composite: static/timeline-view.svg
If you’d like to see more examples, or want to contribute to the project, you can explore the repository and its documentation to tailor video-use to your specific production needs. The open-source nature invites collaboration and iteration, and the architecture is designed to accommodate future enhancements without losing the core strengths: focused, content-driven editing guided by a chat-enabled AI.
Enjoying this project?
Discover more amazing open-source projects on TechLogHub. We curate the best developer tools and projects.
Repository:https://github.com/browser-use/video-use
GitHub - browser-use/video-use: video-use: Edit Videos with Coding Agents
video-use is an MIT-licensed workflow from Browser Use: drop raw footage into a folder, chat with Claude Code, and get a finished video with filler words and de...
github - browser-use/video-use
Maintain video-use: Edit Videos with Coding Agents? Add the badge to your README
Show that the project is featured on TechLogHub and send readers to this write-up.
[](https://techloghub.com/open-source/video-use?utm_source=techloghub_badge&utm_medium=referral&utm_campaign=readme)